Medtech: cavity pressure measurement facilitates GMP-compliant injection molding


Product quality is the overriding priority when it comes to manufacturing injection-molded items for the medtech sector. Compliance with statutory requirements and standardization systems such as Good Manufacturing Practice (GMP) is also a fundamental requirement for every market player. But at the same time, global competition is pushing up expectations for production efficiency. The result? Manufacturers are striving not only to achieve reliable, reproducible and documented quality – but also to keep control of the costs involved. Cavity pressure measurement integrated into the production process gives injection molders an effective instrument that helps them to overcome this dual challenge.

Good Manufacturing Practice (or GMP) comprises guidelines on quality assurance that govern the manufacturing processes and environments for a vast range of goods including medicinal products and medical devices. The goal is a high-quality production process all the way from material procurement through to warehouse logistics: the key to high product quality. But above and beyond this, quality management compliant with GMP and ISO 13485 should ensure that the regulatory requirements for marketing the products are met. In other words: validated high product quality is actually an essential condition in the medtech industry, rather than mainly a competitive advantage or differentiating feature as is the case in other industries.

The two core elements of GMP are qualification of machinery and plant, and validation of processes and methods. The first element requires a planned and documented multi-stage process to show that plant and equipment are basically suitable for the purpose, and that they do actually function reliably under the conditions prevailing on site. Process and method validation also calls for documentation and proof that the processes and methods used will generate reliable and reproducible results, and that the manufactured product will conform to the requirements. To achieve these high standards – especially as regards documentation – process monitoring based on cavity pressure has repeatedly proven its effectiveness in injection molding practice. This parameter is the most informative process value in injection molding, because it gives users a completely transparent view of the process to create a molded part. It goes without saying that this helps users to meet their documentation obligations. And as added benefits, cavity pressure monitoring simplifies process validation during machine setup and makes it easier to optimize production processes – with zero-defect production based on quality prediction models as the ultimate goal.

Medtech industry plastic parts must adhere to high standards
In the medtech industry, validated high product quality is a fundamental requirement.


Relevant correlation with part quality

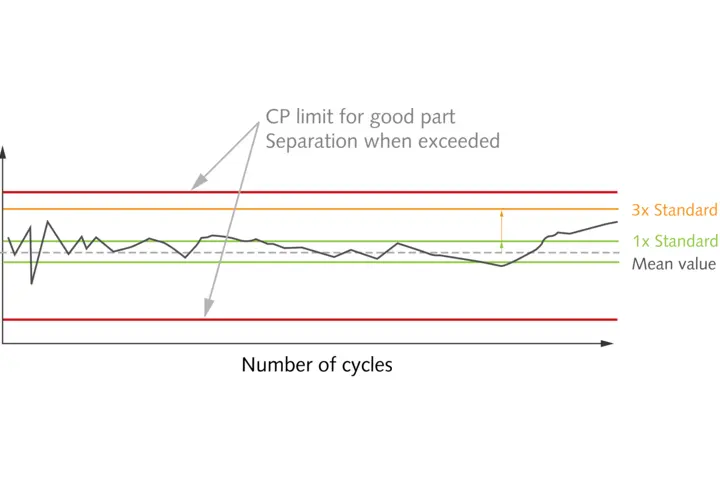
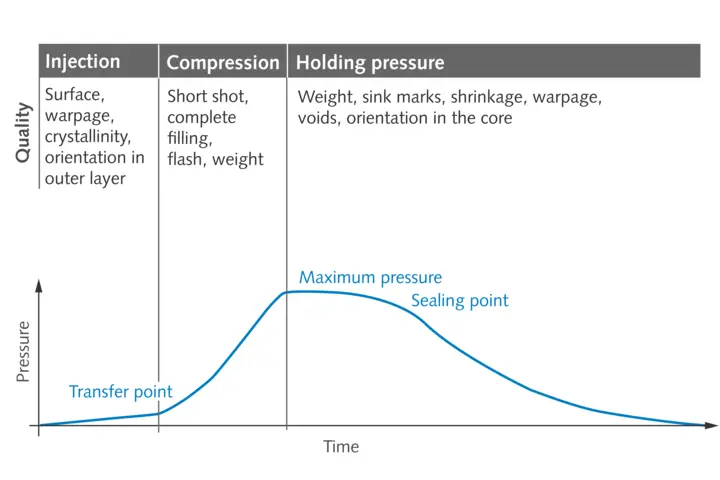
What makes cavity pressure such an informative and highly relevant value? As a process parameter, it is captured directly in the cavities with the help of pressure sensors. It precisely describes the processes taking place in the cavities, thus providing a transparent view of the conditions under which the part is being created throughout the injection molding process. Essential advantages: specific quality-related features of the part such as dimensional accuracy, surface characteristics, weight and degree of molding can be attributed to the cavity pressure profile during the injection, compression and holding phases. It follows that the cavity pressure profile can be considered as a fingerprint of the quality of the specific part that is currently being produced – it provides the basis for precise statements about optimal process parameters all through the production process. Good parts (OK) can already be differentiated from bad ones (NOK) while production is still in progress. For this purpose, the upper and lower limits of the key values are determined for validation of the respective process parameters. If the value determined from the curve then goes beyond the defined process window during production, the part concerned is classified as NOK and will be separated automatically. The result is that only good parts continue further into the value chain. But this is not the only benefit: the characteristic values obtained can also be used as input for statistical process control (SPC) (see Figure 1).

The ideal corridor and deviation in the injection molding process
With the help of cavity pressure measurement, good and bad parts can be automatically differentiated and separated during production.

Validation based on cavity pressure measurement yields even more advantages: for example, significantly less effort is required as compared to methods that exclusively take account of machine process parameters. This is because the processes in the machine cannot adequately describe the formation of the molded part in the cavity, so correlation with part quality is difficult. To achieve consistent part quality, the machine parameters then have to be adapted to new conditions – such as changes in material behavior when batches of different materials are processed. If the fluctuations are so pronounced that the tracked settings are outside the previously validated process window, the process needs to be validated again – which involves a series of time-consuming trials. This can all be made far easier by using cavity pressure measurement, so the correlation between measured values and quality characteristics is known (Figure 2).

Cavity pressure is measured during the entire injection molding process.
The cavity pressure values measured during injection molding phases correlate to the parts' quality characteristics.

Smart combination of measurements and statistics

A process monitoring solution based on cavity pressure measurement consists of sensors that are highly precise but also robust, together with a process monitoring system such as ComoNeo from Kistler. In this case, the ComoNeoPREDICT functionality combined with the STASA QC software enables the system to provide efficient, automated documentation of the test plans (Design of Experiments, or DoEs), and also to perform the corresponding process analyses. This user-friendly functionality can be implemented efficiently on the shop floor, so operators can take a decisive step towards zero-defect production: ComoNeoPREDICT makes it possible to determine the expected quality characteristics from the measured values, with no need to expend effort on measuring the parts. Thanks to this solution, a part's quality can be predicted even before it is manufactured – including the necessary documentation.

Preventive quality assurance

Operating ComoNeoPREDICT in combination with the STASA QC software also reduces the effort required during process analysis and development. To find a stable process window on a qualified machine in the final phase of process development, coordinated DoEs need to be created and executed. The purpose of the DoE with varying machine parameters is to achieve variance of the process conditions represented by the cavity pressure so as to cover the process window. 

Mathematical correlation of the measurement values with the continuous, attributive quality characteristics that are measured afterwards supplies a model for ongoing prediction of the quality of each part produced. The model attains a very high degree of accuracy thanks to special algorithms and the use of machine learning in the STASA QC software. This makes it possible to predict part quality during production, and also to separate parts that are out of tolerance. In practice, this function is performed on a fully automated basis by the ComoNeo process monitoring system and the embedded function of ComoNeoPREDICT. The benefits: the required quality can be guaranteed, and testing costs can be drastically reduced – giving injection molders ideal conditions to safeguard their competitive edge.

Precisa de uma consulta?

Os nossos especialistas estão apenas a um clique de distância.